Sunday, November 23, 2008

Google Spreadsheet Notifications via SMS

Let Google notify you through a text message every time your Spreadsheet changes

The Change Notification feature in Google Spreadsheets currently triggers only an email when ever someone edits your Spreadsheet.
But you can also trigger a Text message too if you want to be notified whenever your Spreadsheet changes.
This is not a feature in Google Spreadsheets, but here's a tweak

Before following these steps you need to make sure that you have a Google Account, a Blog with Blogger.com & create a Google SMS channel.
Before subscribing to or creating an SMS Channel, you need to select a nickname, verify your mobile number and accept the Terms of Service.
Google SMS Channels works only in India

If you don't have them I suggest you create one before you proceed

All set we are ready to go (assuming you have created the above mentioned Google services)


Step 1 :
Create a blog with Blogger
Step 2 : Click on Email tab in Blogger Settings page.
Step 3 : In the "Mail-to-Blogger Address" text field choose an address(e.g user.somename@blogger.com) to post text and images directly to your blog and select the option "Publish emails immediately" and then Save the settings.

Step 4 : Create new SMS Channel & make sure that the "Source:" of the SMS channel is selected as "
Blogger: http://yourblog.blogspot.com"
yourblog is the url of the blog you created in Step 1
Step 5 : Login to Gmail
Step 6 : Create a filter in Gmail such that all emails from "notify@google.com" are forwarded to "user.somename@blogger.com"
Step 7 : Login to Google Spreadsheets, save the sheet & set up a Notification rule such that "Any changes made to the Spreadsheet trigger a Daily digest/Immediate email.
Step 8 : Collaborate your spreadsheet & when they start editing you should receive text messages from Google


Hidden Story

When a collaborator edit your Spreadsheet a notification email is sent to "user@g
mail.com"
This email in turn is forwarded to "user.somename@blogger.com" because of the filter created in Step 6.
This forwarded email is published to the Blog

The blog name that you entered as a source for channel posts/updates in Google SMS channel page is the key to trigger an SMS to your Mobile

View this Presentation in Full Screen

Friday, November 21, 2008

The future of the browser and the Web


Aurora (Part 1) from Adaptive Path on Vimeo.

Welcome to the future — well, one possible future, anyway.

This is Part 1 of Aurora, a concept video created by Adaptive Path in partnership with Mozilla Labs. With Aurora, we set out to define a plausible vision of how technology, the browser, and the Web might evolve in the future by depicting that experience in a variety of real-world contexts.

The release of Aurora is part of the launch of Mozilla Labs’ browser concept series, an ongoing initiative to encourage designers and developers to contribute their own visions of the future of the browser and the Web. Over the next couple of weeks, we’ll be releasing more video segments, as well as background material showing just what went into imagining the future of the Web and translating that into a video.

Fully integrated chat in orkut

As so many of our friends are constantly on orkut, sending scraps, commenting on photos, and bumping hips on BuddyPoke, we figured it was time to make it easy for you to chat directly with your orkut friends whenever they come online. That's why we are excited to announce a fully integrated version of Google Talk that works seamlessly from within orkut, with no install or separate window required.


I'm sure many of you (especially you social butterflies with hundreds of orkut friends), are concerned about being bombarded with chat requests every time you go online. Not to worry! To get you started, we've come up with a formula that automatically predicts which of your orkut friends you probably want to chat with, and only tells those people that you're signed into Google Talk. Our formula takes a bunch of things into consideration, giving preference to people who you've labeled as 'best friends' or written scraps to recently, and people who have friends in common with you.

We realize that no one knows who you'd like to talk to better than you do, so we've also made it easy for you to add and remove people from your list of orkut chat friends. To make changes to the list, just go to the revamped Google Talk settings page. Don't worry, only you can see your list of chat friends, so there's no need to worry about any hurt feelings when you make changes. :-)

If you already use Google Talk, either on its own or as part of Gmail, then your friends signed into Google Talk in other applications will also be able to chat with you when you come online.


To sum up, the new Google Talk in orkut lets you:

  • chat with your orkut friends in real time from directly within orkut
  • control which of your orkut friends can chat with you
  • chat with your Google Talk and Gmail chat contacts
  • visit different orkut pages while keeping your chatboxes open

We hope you have as much fun with this new feature as we've had creating it. We'll be rolling it out to all of our users over the next few weeks, so keep your eyes peeled for a note from us.


Thursday, November 20, 2008

Spice up your inbox with colors and themes in Gmail


Gmail fans have been building unofficial extensions to spice up their inboxes for a while, but up til now themes haven't been an integral part of Gmail. We wanted to go beyond simple color customization, so out of the 30 odd themes we're launching today, there's a shiny theme with chrome styling, another one that turns your inbox into a retro notepad, nature themes that change scenery over time, weather driven themes that can rain on your mailbox, and fun characters to keep you in good company. There's even an old school ascii theme (Terminal) which was the result of a bet between two engineers -- it's not exactly practical, but it's great for testing out your geek cred. We've also done a minor facelift to Gmail's default look to make it crisper and cleaner -- you might notice a few colors and pixels shifted around here and there.


As you can see from these photos taken around our office in Zurich, Switzerland, themes have made their way into more than our inboxes -- that's a character from the ninja theme made out of pixel blocks, customized laptop decals, and a giant Zoozimps character on a beam next to my desk:


To customize your inbox, go to the Themes tab under Settings. It'll be rolled out to everyone over the next couple of days, so if you don't see them yet, check back soon.


Wednesday, November 19, 2008

How to Set up Ad hoc Wifi - Wireless Networking Without a Router (Vista/XP)

How to Set up Ad hoc Wifi - Wireless Networking Without a Router (Vista/XP)

adhocnetwork 

Based on my observation, an adhoc network is a wireless network connection without a central node. The network is  dispersed which requires no base station (Router).

Using the Network Setup, devices such as PSP, Laptops, and other portable gaming consoles can search, share and link each other within range without using a router or a hub.

Advantage

  1. Easy to setup: No additional Software is needed and It's FREE
  2. Nowadays, By default Wi-fi or Wireless Card is included when you bought a computer especially in laptops. Even if it's not included USB type Wifi is now cheap.
  3. Portability and Mobility
  4. No more wires and additional devices such as hub and routers

Main Disadvantage

If you'll share or connect other computers and devices to the Internet. The computer that is connected to the Internet (Gateway) must always be turned on. Unlike using a router, you can turn off any computers in the network.

Read more: Internet Connection Sharing (ICS) in Ad Hoc Connection

Distance: Computers and devices in ad hoc connection must be within 30 feet of each other (although you can extend this by using a passive repeater by simply creating a parabolic antenna using a USB type Wi-fi and other types of antenna)

How to Create an Ad hoc Wireless Network (Automatic IP Address Configuration)

Windows Vista

1. Launching Setup a Network or connection Window

Choose "Set up a wireless ad hoc (computer-to-computer) network Set up a temporary network for sharing files or an Internet connection"

setup

There are several ways to access this Window, here they are:

a. Right-Click the Wireless Network Icon in the Taskbar's Notification Area > Connect to a Network > At the Bottom, Click the Setup a Connection or Network

b. Right-Click the Wireless Network Icon from the Notification Are > Network and Sharing Center > In the Left Pane, choose Setup a Connection or Network link

c. Start Menu > Connect To Button > At the Bottom, Click the Setup a Connection or Network link

d. Using the New Control Panel View: Start Menu > Control Panel > View network status and tasks > In the Left Pane, choose Setup a Connection or Network link

controlpanelhome2

Using the Classic Control Panel View: Start Menu > Control Panel > Network and Sharing Center > In the Left Pane, choose Setup a Connection or Network link

2. Creating Ad hoc Network Window

setup22

"Set up a wireless ad hoc network

An ad hoc network (sometimes called a computer-to-computer network) is a temporary network used for sharing files, presentations, or an Internet connection among multiple computers and devices.

Computers and devices in ad hoc networks must be within 30 feet of each other.

If you're currently Connected to a wireless network, you might be disconnected when you set up this network."

Click Next Button to Start Creating Ad hoc Network.


3. Write the Network Name, Password (Security Key) and other Security options (No authentication (Open)/WEP/WPA2-Personal)

setup33


4. Click the Next Button to Create and Connect to the Network

setup44 

To be able to activate the Ad hoc Network that you have just created, more than 1 computers or devices must be connected to the network.

Setting up the IP-address in Vista/XP

1

1. From my previous tip: Open the Network Connections

type and launch the command: ncpa.cpl

or Control ncpa.cpl

2. Right-Click the Wireless Network Connection > Properties >  Internet Protocol Version 4 (TCP/IPv4) > Properties Button > Select "Use the following IP address:"

Examples: Class C - Most Common Home Configuration

Computer A Computer B Device C

192.168.0.1

192.168.0.2

192.168.0.3

255.255.255.0 255.255.255.0 255.255.255.0

Range: 192.168.0.0 - 192.168.255.255

For more information: http://en.wikipedia.org/wiki/IP_address

To Connect: Right-Click the Wireless Icon > Connect to a Network > Find the name of the ad hoc Network > Click the Connect Button > Input the Passphrase or Security Key and finally Click the Connect Button again.


Windows XP

viewwirelessnetworks


Right-Click the Wireless Network Icon > Choose View Network Wireless Networks


In the Left Pane > Click "Change advanced settings" link

changeadvancedsettings


Make sure that you are using Windows to configure your wireless network settings and click the Add Button

adding 


Enter the Network Name (SSID), Set the Network Authentication, Data Encryption, Network key and Choose the option "This is a computer-to-computer (ad hoc) network; wireless access points are not used.

namenetworkkey

Finished. 

finished

Enjoy!

Note: Some countries with Obsolete Radio Laws prohibits anybody to broadcast radio signals (outside your house) without a license from the government. Wifi is a form radio that uses 2.4Ghz Band and 5Ghz for some designs.

So, Please Read your Radio Laws first and check the sticker in the device!


IPv6: What is Internet Protocol?

IPv6: What is Internet Protocol?——————————————————————————————

Internet Protocol (IP) is one of many communications protocols that compose the Internet Protocol Suite (IPS) and is arguably the most important protocol. Experts usually describe IPS as a stack of protocols that convert application information (like e-mail or Web traffic) into digital packets capable of traversing networks, including the Internet.

Specifically, IP is responsible for transmitting the digital packets from a source host to a destination host over a network connection. The Request for Comment (RFC) 791 is the last word about IP and provides the following definition:

"The internet protocol is specifically limited in scope to provide the functions necessary to deliver a package of bits (an internet datagram) from a source to a destination over an interconnected system of networks. There are no mechanisms to augment end-to-end data reliability, flow control, sequencing, or other services commonly found in host-to-host protocols. The internet protocol can capitalize on the services of its supporting networks to provide various types and qualities of service."

Packets and datagrams: Is there a difference?

When discussing IP, many people (including me) interchange the terms packet anddatagram as both terms have similar (identical, some argue) definitions. RFC 1594defines a datagram/packet as:

"A self-contained, independent entity of data carrying sufficient information to be routed from the source to the destination computer without reliance on earlier exchanges between the source and destination computer and the transporting network."

Since they're the same, why worry about definitions? Well, sometimes experts define packets differently from datagrams, and that's when it gets confusing. They use the term packet when discussing reliable data transmission protocols such as TCP/IP, and then use the term datagram when talking about best-effort data transmission protocols like UDP. For our discussion of IP, it doesn't matter which term is used, but I'd like to stick with datagram (you'll see why in a moment).

IP attributes

IP has several attributes that define how data is transmitted, and they're important regardless of whether we're discussing IPv4 or IPv6. So, let's take a look at them:

  • Host addressing: IP defines the addressing scheme for each host on the network and uses the addresses to facilitate datagram delivery.
  • Protocol independence: IP by design is able to work with any type of underlying network protocol using protocol stack technology.
  • Connectionless delivery: IP does not set up a relationship between the sending host and the receiving host. The sending host just creates datagrams and sends them on their way.
  • Best-effort delivery: IP tries its best to ensure that the receiving host actually gets the datagrams addressed to it, but there are no guarantees.
  • No provision for delivery acknowledgments: The receiving host does not acknowledge the fact that it indeed did receive the data addressed to it.

One wonders how IP datagrams get where they're supposed to, when the last three attributes create less than a perfect environment. Why leave those features out of the protocol? The simple reason is better performance. Using established connections, error-checking, and guaranteed delivery require additional processing power and network bandwidth. So if the datagram being transmitted does not require certain attributes, it's better they aren't used. Besides, the people who developed IP are a smart bunch, designing a more efficient approach that uses protocol stacking.

Protocol or TCP/IP stack

If you recall, I mentioned something called a protocol stack (officially TCP/IP) earlier. If the type of transmitted data (such as e-mail) requires guaranteed delivery, receipt acknowledgment, or an official connection handshake, the information is appended earlier in the datagram-building process, or what is called "further up the stack." It turns out to be good solution, especially since it conserves network resources.

On a side note, I debated whether to include information about the TCP/IP stack in this discussion, as we're supposed to be focused on IP. The only problem is that it's very hard to divorce TCP from IP. Especially since a large percentage of datagrams include TCP information.

TCP/IP Guide has an excellent explanation of what a TCP/IP stack is and how it works. The process of encapsulation (ultimately why I included this information) also takes place in the TCP/IP stack. Encapsulation is where the next protocol in the stack encapsulates the datagram, giving it additional information that's required, so the packet can successfully reach its destination. The following diagram (courtesy of TCP/IP Guide) depicts the encapsulation process:

ip-encap.png

IP datagram format

To get a better understanding of what (besides data) is sent in a datagram, we need to look at the datagram's format. The following diagram (courtesy of TCP/IP Guide) shows all the various fields of an IPv4 datagram. For more information about each field in the datagram, please refer to this TCP/IP Guide link.

ipv4format.png

As a point of comparison, the next diagram (courtesy of TCP/IP Guide) is the IPv6 datagram format. Once again, for more information about the individual fields, please refer to this TCP/IP Guide link.

ipv6format.png

It's interesting how the IPv6 datagram format is consolidated and actually makes more sense. For example, changing the TTL field to hop limit is a much better description.

Next time

In this article, I tried to point out the commonalities shared by IPv4 and IPv6, with the exception of the datagram formats. The rest of the series will deal with IPv6, the differences between it and IPv4, and why IPv4 needs to be phased out. If everything works out, the next edition will be a podcast with Mr. Joe Klein, senior security researcher for Command Information and a member of the North American IPv6 Task Force. He'll be discussing why IPv4 is on its last legs.

Final thoughts

I first wanted to thank everyone for all the useful comments and suggestions in my previous article, "IPv6: Where to Begin." This article is the direct result of those comments. Besides, truth be told, I needed a starting point, and a high-level review seemed like a good idea. I hope you agree; now we can move the discussion to IPv6 and all its nuances.

I also wanted to make mention of the Web site TCP/IP Guide. It's written and maintained by Mr. Charles M. Kozierok and, in my world, is one of the best resources for anything dealing with TCP/IP.


How to use the Task Manager


How to use the Task Manager

 
Task Manager is a tool that allows you to easily monitor your computer's activity and which helps you control the programs, services and processes that are currently running. You can also view details about the network traffic, the performance of the computer and the number of users that are connected at a given time. In this article I will show you how to use this tool and I'll present you its most important features and options.

How to start the Task Manager

To open the Task Manager just right click somewhere on the empty space of the taskbar and click on Task Manager.

Task Manager

A more refined way is to press the keys CTRL + SHIFT + Esc or press CTRL + ALT + DEL and then click on the Task Manager link.

Task Manager

Another way is to open the Start Menu, type taskmgr or taskmgr.exe in the search box and press Enter.

Task Manager

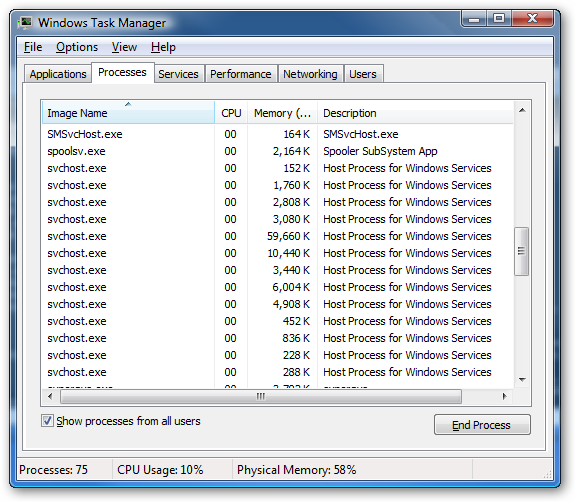
Once you open it, Task Manager should look like in the screenshot below.

Task Manager

As you can see, the Task Manager window has a series of menus and tabs with different options. First, we will show you what options are available in each tab and then we will present what can be done in each menu.

Possible Problem: if the Task Manager window has no menus and tabs, just like in the screenshot below, it means that it is running in the so called tiny footprint mode.

Task Manager

To have your Task Manager window return to normal, double click on the blank gray area which I highlighted above.


How to work with the Applications tab

In the Applications tab you can force an application to close if it is not working properly by selecting it and clicking on the End Task button. However, you should be careful when closing an application with the End Task option because you might lose important data that hasn't been saved. The End Task should be used only when an application is not responding. When that happens, Task Manager will show 'Not responding' in the Status column.

Task Manager

To see what process an application is using, just right click on the desired application and, in the context menu, click on 'Go To Process'. This will automatically send you to the Processes tab, where you will see the process associated to the selected application.

Task Manager

When you right click on an application you will see several options including 'Switch To' and 'Bring to front'. Choosing 'Switch To', will make that application be the active one instead of the current one and it will be brought to the front of your Desktop. Choosing 'Bring to front' will also bring the selected application to the front of your Desktop. However, it won't work if there is another program that has the property Always on top set.

The last important thing that can be found in the Applications tab is the New Task button. It can also be found in the top menu bar by clicking on the File menu. This is similar to the Run button in the Start Menu and you can use it to start other applications.


How to work with the Processes tab

The Processes tab gives you information about the processes that are running on your PC. If you want to know more about a certain process, select it with the mouse, right click on it and select Properties.
If you want to know the exact location where a certain process can be found on the hard disk, select it with the mouse, right click on it and select Open File Location.

Task Manager

Task Manager will open a Windows Explorer window which shows the folder from where the process is running.

Sometimes a process can be the parent of other processes known as children processes. This hierarchy relation between processes is similar to a family tree. If you want to end a parent process and its children processes you should use the End Process Tree option. To end a process tree, right click on the process you want to end and, in the context menu, click on the End Process Tree. However, don't use this option without further analysis because you might also end a process that you still want to have running.

Task Manager

Another useful option in the Processes tab is the priority option. This option allows you to set which application will receive more attention from the operating system. The more attention a process receives, the faster that process is being listened by Windows Vista. However, if one process gets too much attention, the other ones will get less considered, so caution is needed. To change the priority of a process, right click on a process and go to 'Set Priority' and select one of the available options.

Task Manager

One of the most unused but powerful features that Windows Vista has is the 'Processor Affinity'. This is an useful option if you have, for example, a multi-core processor in your computer. If you do, you can make some processes run on one processor and the rest on the second, third, etc. This will, in some cases, make the computer work more efficiently. However, if you are to set affinity to the processes, try to split the work done by them. To use this option, right click on a process and click on 'Set Affinity...'. A new window will appear and you will have to decide, by checking one of the boxes, on which processor you want to run that process. If you are not sure you want to work with this, you should leave it as it is but you should know that the changes you have made will not be permanent. They will revert to default once the application is closed or when the computer is restarted.

Task Manager

If you want to have more information about the running processes, you can add more columns. Almost every tab has more columns that are available for you to use. To view other columns, click on the View menu and select 'Set Columns'. After you have selected the columns you wish to see, click OK and now you will have those column appear in the processes tab.

Task Manager

If you want to arrange columns in a specified order you just need to click, hold and drag the name of that tab to the desired place.

Task Manager

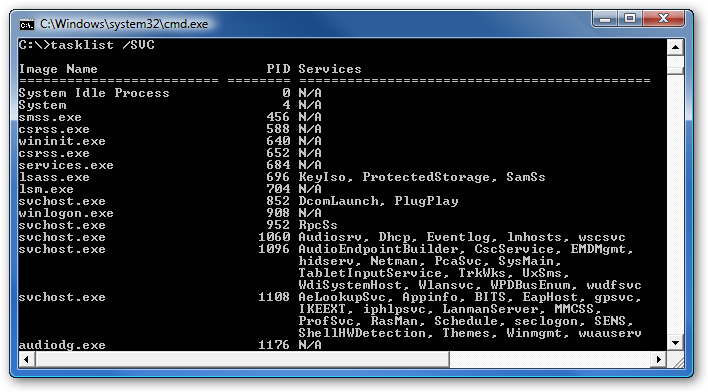
To see the service that is running behind a certain process right click on the process and click on 'Go to Service(s)'. If the process has a service running you will be automatically taken to it. If not, you will be shown the Services tab but nothing will be selected.


How to work with the Services tab

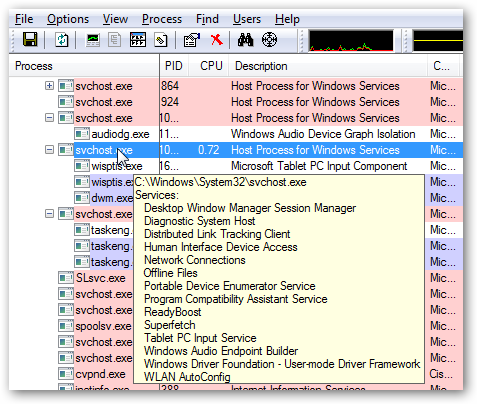
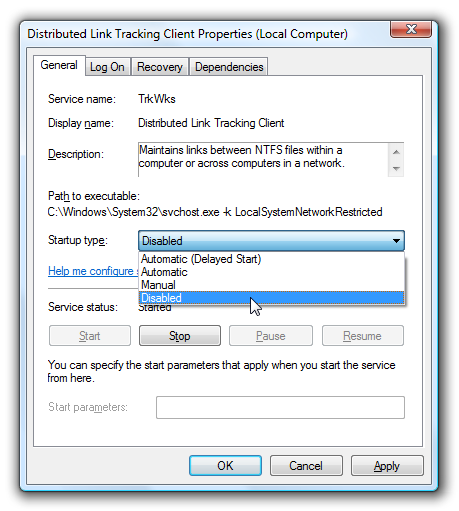
A service is an application or process that runs deep into the heart of the operating system. For example, you can find services related to the printer, the network, Windows Defender, Event Log and much more. However, while all services can be changed some are better left as they are by default. In the Services tab, right click on a service and click to Stop or Start the selected service.

For more details about the service(s) running you can click on the Services button.

Task Manager


How to work with the Performance tab

To see the performance of your computer click on the Performance tab. Here, you will see details regarding your computer. The Performance tab is self explanatory. It shows the performance of your computer with the help of graphs and numbers. Basically, the idea is to have the graph line to a low altitude and the numbers to an acceptable level. If the performance of the computer is problematic and slows your everyday activity you can study its cause with the help of these graphs and numbers. For a more in depth view of the performance you can click on the 'Resource Monitor' button.

Task Manager


How to work with the Networking tab

If you are connected to a network, you can monitor details about its connection in the Networking tab. For more details you can use the View menu, go to 'Select columns' and add more columns to thoroughly examine your network traffic. Another way to see details about your network connection is to open the 'Resource Monitor' from the Performance tab.

Task Manager


How to work with the Users tab

The Users tab shows who is currently connected to your computer. If you want to know the location of an user, connected on your computer or to the network, click on the Users tab and from the top menu and the on Options. In the menu that appears under the Options click on 'Show Full Account Name'. In the User column of the Users tab you will now see the full location path of that user.

Sometimes you might want to send a message to another user that is connected to the computer but is not around at the time. To do this, click on the Users tab and select the user to whom you wish to send your message. Once you have selected the user click on the 'Send message' button.

Task Manager

A new window will appear and in that window you can send your message. When the user logs in, he will receive your message.

Task Manager

However, if you have a limited account, meaning not an administrator, then you might have surprises when sending such messages. If this happens, you might consider other alternatives for sending messages.

Task Manager

Also, if you want to close somebody's connection to the computer, click on the Users tab, select the user and click on the Logoff button. Windows Vista will warn you about the decision you are about to take. If you are sure that you want to end the users session, click on the Log off user button.

Task Manager


Enable or Disable the Always On Top option

The Task Manager has the 'Always on top' option activated. This makes it show up in front of other applications. Even if you open a new application, or click on an application that is already opened, it will show up behind Task Manager. To disable this feature and make Task Manager act as a regular window, click on the Options menu and then on Always on top so that this option will be disabled.

Task Manager


How to quickly see the Task Manager if minimized

If you disabled the 'Always on top' or made the Task Manager to hide when minimized, you can quickly see it again by clicking on its icon from the taskbar.

Task Manager


What is svchost.exe And Why Is It Running?


You are no doubt reading this article because you are wondering why on earth there are nearly a dozen processes running with the name svchost.exe. You can't kill them, and you don't remember starting them… so what are they?

So What Is It?

According to Microsoft: "svchost.exe is a generic host process name for services that run from dynamic-link libraries". Could we have that in english please?

Some time ago, Microsoft started moving all of the functionality from internal Windows services into .dll files instead of .exe files. From a programming perspective this makes more sense for reusability… but the problem is that you can't launch a .dll file directly from Windows, it has to be loaded up from a running executable (.exe). Thus the svchost.exe process was born.

Why Are There So Many svchost.exes Running?

If you've ever taken a look at the Services section in control panel you might notice that there are a Lot of services required by Windows. If every single service ran under a single svchost.exe instance, a failure in one might bring down all of Windows… so they are separated out.

Those services are organized into logical groups, and then a single svchost.exe instance is created for each group. For instance, one svchost.exe instance runs the 3 services related to the firewall. Another svchost.exe instance might run all the services related to the user interface, and so on.

So What Can I Do About It?

You can trim down unneeded services by disabling or stopping the services that don't absolutely need to be running. Additionally, if you are noticing very heavy CPU usage on a single svchost.exe instance you can restart the services running under that instance.

The biggest problem is identifying what services are being run on a particular svchost.exe instance… we'll cover that below.

If you are curious what we're talking about, just open up Task Manager and check the "Show processes from all users" box:

image

Checking From the Command Line (Vista or XP Pro)

If you want to see what services are being hosted by a particular svchost.exe instance, you can use the tasklist command from the command prompt in order to see the list of services.

tasklist /SVC

image

The problem with using the command line method is that you don't necessarily know what these cryptic names refer to.

Checking in Task Manager in Vista

You can right-click on a particular svchost.exe process, and then choose the "Go to Service" option.

image

This will flip over to the Services tab, where the services running under that svchost.exe process will be selected:

image

The great thing about doing it this way is that you can see the real name under the Description column, so you can choose to disable the service if you don't want it running.

Using Process Explorer in Vista or XP

You can use the excellent Process Explorer utility from Microsoft/Sysinternals to see what services are running as a part of a svchost.exe process.

Hovering your mouse over one of the processes will show you a popup list of all the services:

image

Or you can double-click on a svchost.exe instance and select the Services tab, where you can choose to stop one of the services if you choose.

image

Disabling Services

Open up Services from the administrative tools section of Control Panel, or typeservices.msc into the start menu search or run box.

Find the service in the list that you'd like to disable, and either double-click on it or right-click and choose Properties.

image

Change the Startup Type to Disabled, and then click the Stop button to immediately stop it.

 image

You could also use the command prompt to disable the service if you choose. In this command "trkwks" is the Service name from the above dialog, but if you go back to the tasklist command at the beginning of this article you'll notice you can find it there as well.

sc config trkwks start= disabled

Hopefully this helps somebody!